A step by step guide for the Pwnage Tool for iPhone firmware 2.1
Before you begin unlocking your 2G iPhone here are some things you need to know or do:
1. Back up your iPhone (contacts, mails, calendar and etc.).
2. Upgrade to iTunes 8.
3. Download and install Pwnage Tool for Firmware 2.1 from blog.iphone-dev.org.
4. Unlock your iPhone at your own Risk.
5. This guide has been tested with 2G iPhone only so don't try this with your iPod Touch!
6. This guide if for Mac users only.
7. Read blog.iphone-dev.org for more instructions.
The very first thing to do is to upgrade your iPhone firmware to version 2.1 and the only way to do this is though your iTunes 8. If you have not upgraded your iTunes yet then you can not update your iPhone firmware. After updating your iPhone firmware you are now ready to use your Pwnage tool.
Step 1: Open your Pwnage Tool from your Applications folder.
 PLEASE NOTE: COPY THE PWNAGE TOOL APPLICATION TO YOUR APPLICATIONS FOLDER OR DESKTOP BEFORE RUNNING. RUNNING DIRECTLY FROM THE DISK IMAGE WILL CAUSE ERRONEOUS BEHAVIOR (such as missing bootloader files and other oddities).
The two modes are:
1. Simple Mode - Which provides step by step instructions as below and automatically detects your correct firmware and adds the unlock and activation and jailbreak with Cydia automatically to your custom firmware.
2. Expert Mode - Where you can adjust the settings on the various different additions to the custom firmware - if you click through and do not change anything in expert mode it will make the same custom firmware as simple mode however doing this instead of simple mode can fix issues with the simple firmware not working correctly.
Step 3: Select what device you want to pwn. Click iPhone.

Step 4: Select the firmware bundle .ipsw that you wish to use. You will be prompted if Pwnage Tool cannot find this file, as a last resort you can browse for these files and you will be prompted to ask if you would like to do so.
 PwnageTool will AUTOMATICALLY search for the correct firmware for your device. IMPORTANT: iPhone and iPhone 3G firmware is differently named. original iPhone firmware for 2.0 is named iPhone1,1_2.1_5F136_Restore.ipsw iPhone 3G firmware is named iPhone1,2_2.1_5F136_Restore.ipsw
 You can make sure you have the correct firmware on your mac by connecting your iPhone/iPod to iTunes and clicking on restore then iTunes will download the correct firmware. Disconnect your device when downloading as you don't want to restore with standard firmware!
If you are going to unlock your original iPhone then you will need the bootloader files for 3.9 and 4.6 - the following steps let you select them.
PwnageTool will automatically detect the bootloader files for you if they are on your mac. Bootloaders can be downloaded from : http://www.enkrypted.com/bootloaders.rar
Once you have downloaded bootloaders next step is to configure your iPhone using the expert mode of the pwnagetool.
Step 5: Select General
 Step 6: Put a check mark on the "Enable baseband update"
 Step 7: Put a check mark on the "Update bootloader" and select Upgrade to 4.6
 Step 8: Select what package to install from Cydia.
 You have to click "Download Packages" tab, hit the Refresh button and add the items manually to populate the list as shown in the picture above.
Thanks to John for the help.
Step 9: Customize package settings
 Step 10: Customize boot logo
 Step 11: Browse for your customized Boot logo file saved in your computer.
Step 12: Upload your custmoized Boot logo file.

Step 13: Now you are ready to build your customized iPhone Software... Click "Build".

Step 14: Save your custom .ipsw file to desktop.

Step 15: Pwnage Tool will now build your .ipsw file.

Step 16: Input your admin password.

Step 17: Click NO!

This is the tricky part if you answer yes your iPhone won't have any carrier signal! So be sure to click "NO"!
Step 18: Turn of your iPhone. Please note that after turning off your device, series of instructions will be flashed on screen and you will have to follow them correctly. Failure to do so will cause DFU mode to fail.

Thanks again to John for contributing.
Step 19: Congratulations you have entered DFU Mode!

Step 20: Time to restore your iPhone with your custom .ipsw! Close Pwnage tool.
 Step 21: Open iTunes 8. You will be prompted to check with the Apple servers to determine the device type. Click the "Check" button to get into recovery mode as shown in the screenshot below.
Thanks again to John for his valuable contribution.
Step 22: Restore you iPhone with your customized .ipsw file. Be sure to hold down the alt key while you click the restore button.
 This is another tricky part....be sure to hold down the "alt" key while you click the restore button so that you will be able to browse for the custom .ipsw file you saved in you desktop.
WARNING!
If you don't hold down the alt key you will be restoring the original iPhone firmware!
Step 23: Browse for your custom .ipsw file saved on your desktop.

Step 24: Wait for a few moments while your .ipsw file is being extracted.

Step 25: Patience is a Virtue!

WARNING!
This might really take a long time so please be patient! Turning off or restarting your iPhone at this point may cause permanent damage!
This might really take a long time so please be patient! Turning off or restarting your iPhone at this point may cause permanent damage!
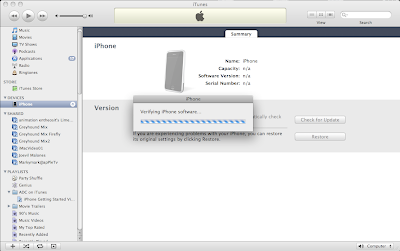
Step 26: Your almost done! Allow iTunes to verify your iPhone software.
Step 27: Congtatulatons you just Pwned your iPhone! But there are still a few steps to complete the process. At this point you need to restore your backup of your contacts, mail, calendar, iPod music and etc.
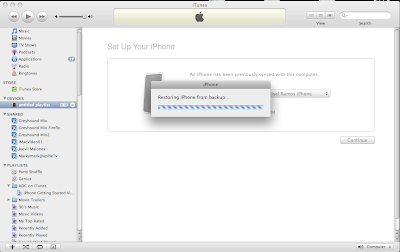
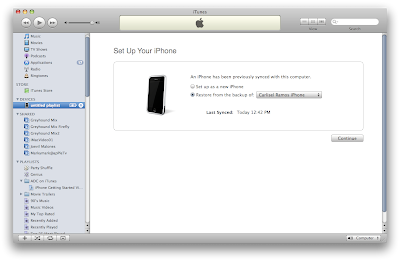 Step 28: Restoring from backup. Depending on how many photos, music files and etc. you have, this might take 20 - 30 mins. So please be patient.
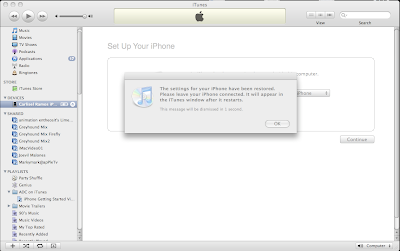
Step 29: Congratulation you have successfully Pwned and restored your iPhone!

Step 27: Congtatulatons you just Pwned your iPhone! But there are still a few steps to complete the process. At this point you need to restore your backup of your contacts, mail, calendar, iPod music and etc.
 Step 28: Restoring from backup. Depending on how many photos, music files and etc. you have, this might take 20 - 30 mins. So please be patient.
Step 29: Congratulation you have successfully Pwned and restored your iPhone!


